UI-Router for React - Hello Galaxy!
In the “Hello Solar System!” app, we created a list/detail interface.
We showed a list of people and allowed the user to drill down to view a single person’s details.
We implemented both the people and person states as siblings (peers to each other).
When people was active, person could not be active, and vice versa.
In this section, we will create a parent-child state relationship by nesting the person state inside the people state.
We will also nest their views, showing person details inside the people component.
Live demo
As usual, let’s first look at a live demo of the finished “Hello Galaxy” app.
Click the “People” tab, then click on a person.
When you switch from one state to the another, it is called a Transition. On the bottom of the live demo, the UI-Router Transition Visualizer shows each transition visually, and provides transition details when hovered and/or clicked.
Nesting States
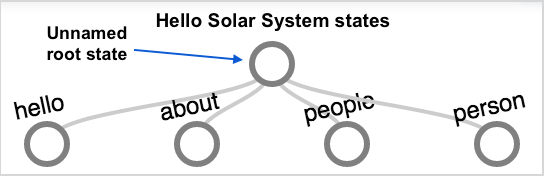
UI-Router states form a tree, starting from a single root state.
The root state is implicit and has no name.
The top-level application states (such as about and people) are children of the implicit root state.
The “Hello Solar System” app had four top-level states, while the “Hello Galaxy” app has three top-level states and one nested state.
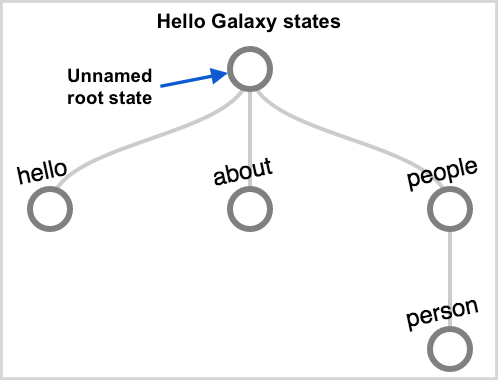
The person state is now a child of the people state.
The new person state definition:
const person = {
  name: 'people.person',
  url: '/:personId',
  component: Person,
  resolve: [{
    token: 'person',
    deps: ['$transition$', 'people'],
    resolveFn: (trans, people) =>
      people.find(person => person.id === trans.params().personId)
  }]
}
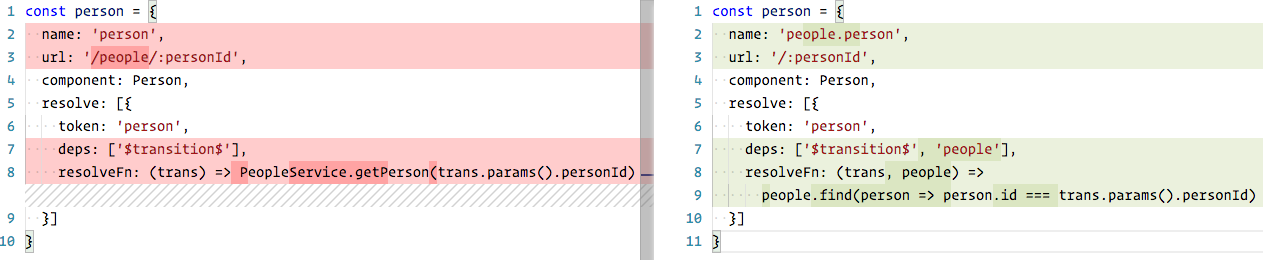 We made some changes to the
 person state properties to make it a nested state… let’s go over each change.
State name
We changed the name: from person to people.person.
When naming a state, prepending another state’s name (and a dot) creates a parent/child relationship.
In this case, the people.person state is a child of the people state.
Another way to create a parent/child relationship is with the parent: property of a state definition.
URL
We changed the url: from /people/{personId} to the url fragment /{personId}.
The child state’s url: property is a url fragment (a partial url).
The full url for a child state is built by appending the child state’s url fragment to the parent state’s url.
The url for the parent state (people) is still /people.
Appending /{personId} to /people results in /people/{personId} (which is the same as our previous person url).
The router will map a browser url of /people to the people state.
It will map a browser url of /people/123 to the person state, with a peopleId parameter value of “123”.
Resolve
We changed the resolve: to use the data from the parent resolve, instead of fetching it from the server.
As before, when you click the “People” tab the router fetches the people resolve from the server API,
then activates the people state and renders the view.
With our new nested state setup, the person resolve is a bit different.
When we click a specific person, the router still invokes the person resolve before activating the person state.
However, this resolve is a bit different.
Instead of fetching the person from the server, the person resolve injects the parent state’s people resolve.
Since the list of people is already loaded in the parent resolve, no additional fetching occurs.
A resolve function may inject the results of other resolves from ancestor states, or from other resolves on the same state.
Views
The view for person hasn’t changed.
It is still a component named Person, which has a resolves attribute in its props.
The resolve data named person is still passed via the component props.
However, the parent state’s People component has changed a bit.
render () {
  let {people} = this.props.resolves;

  let list = people.map(person => (
    <li key={person.id}>
      <UISref to=".person" params={{personId:person.id}}>
        <a>{person.name}</a>
      </UISref>
    </li>
  ));

  return (
    <div className={this.props.className}>
      <div className="flex-h">
        <div className="people">
          <h3>Some people:</h3>
          <ul>
            {list}
          </ul>
        </div>
        <UIView className="debug__UIView" />
      </div>
    </div>
  );
}
We’ve added some container divs for layout and embedded a nested <UIView> viewport.
When a child state of people is activated, its view is put into the viewport.
We also added some styling to create a side by side layout, so the nested viewport appears on the right.
Note the nested <UIView> when “People” is activated.
That <UIView> is filled with the person view when the person state is active.
Links
We also changed the UISref links in the people state which drill down to a specific person.
Previously, these links were <UISref to="person" params={{personId:person.id}}><a>{person.name}</a></UISref>.
Since the person state is now named people.person, we changed the links to <UISref to="people.person" params={{personId:person.id}}><a>{person.name}</a></UISref>.
We could also have used relative addressing: <UISref to=".person" params={{personId:person.id}}><a>{person.name}</a></UISref>.
Since the UISref was created in the people state’s view and it relatively targets .person, the final target state is people.person.